D-Secure Drive Verifier

Complete User Guide & Documentation

About D-Secure Drive Verifier

D-Secure Drive Verifier is an erasure verification tool. After a drive has been wiped, Drive Verifier reads the drive back and examines the bit patterns it finds to confirm that no recoverable data traces remain. It is built for ITADs, refurbishers, resellers and IT teams that need proof for every drive they sanitize.

Every verified drive gets its own digitally signed, tamper-evident report. Reports are uploaded to the D-Secure Cloud Console, where they are stored in one place together with user and licence management, and each report can be checked later on the public report verification page.

Drive Verifier verifies drives wiped with 27+ erasure methods, so it can be used as an independent check after D-Secure Drive Eraser or after other erasure software.

Key Features:

  • Read-Back Verification — Scans the drive and examines bit patterns to find any data traces left after erasure.
  • Total and Random Verification — Read back the whole drive, or a random sample of it.
  • Wide Interface Support — SATA, PATA, SCSI, SAS, NVMe, USB and SD cards.
  • 27+ Erasure Methods — Verifies drives erased with more than 27 erasure methods.
  • HexViewer — Built-in hex viewer to manually confirm erasure success.
  • Digitally Signed Reports — Tamper-evident reports in PDF, CSV, XML, JSON and HTML.
  • Asset Tagging — Advanced asset tagging and customizable report fields.
  • Cloud Console — Central repository for verification reports, users and licences.
  • Flexible Deployment — Bootable ISO (USB), PXE network boot, Windows EXE, macOS universal DMG and Linux tar.gz.
  • Report Integration — Reports import into IT asset management or ERP systems, with API integration available on request.

About the Guide

This user guide explains how to install, sign in to and use D-Secure Drive Verifier, how to read verification results and how to work with verification reports.

  1. About D-Secure Drive Verifier
  2. About the Guide
  3. System Requirements — Platforms, connectivity and account
  4. Getting Started — Deployment options, bootable media, PXE and desktop installation
  5. Signing In & Licence Validation — Account sign-in and how credits work
  6. Working with D-Secure Drive Verifier — Selecting drives, running a verification, reading results and using the HexViewer
  7. Reports — Formats, digital signature, cloud upload and report verification
  8. Troubleshooting & FAQ
  9. Contact & Support

This is a web-based guide and requires an active internet connection. You can read it in all popular browsers such as Chrome, Firefox and Safari.

System Requirements

Before you start, make sure the following is in place:

  • Platforms — Windows, macOS and Linux for the installed application, or any machine that can boot from USB or over PXE for the bootable edition.
  • Software Variant — Cloud / Network PXE.
  • Supported Drive Interfaces — SATA, PATA, SCSI, SAS, NVMe, USB and SD cards.
  • Internet Connection — Required. Drive Verifier validates your licence and uploads reports online, so the machine must be able to reach the D-Secure services over HTTPS.
  • D-Secure Account — A D-Secure account (or subuser account) with an active Drive Verifier licence and available credits.
  • Boot Media or PXE Server — A USB flash drive for the bootable ISO, or a PXE server on your network for network boot.

Internet connection required:

Licensing is online only. Without an internet connection Drive Verifier cannot validate your licence or upload reports.

Getting Started

Deployment Options

D-Secure Drive Verifier can be deployed in several ways. Choose the one that fits your workflow:

Bootable ISO / PXE

Boot from a USB drive or over the network with PXE. PXE network boot verifies many machines at once.

Windows (EXE)

Install Drive Verifier on a Windows workstation.

macOS (universal DMG)

One installer for both Intel and Apple silicon Macs.

Linux (tar.gz)

Archive for Linux workstations.

A customised ISO image can also be built to automate repetitive verification jobs. Contact D-Secure if you need one.

Creating a Bootable USB

To boot D-Secure Drive Verifier from USB, write the Drive Verifier ISO image to a USB flash drive. We recommend UNetbootin, the same tool used for the other D-Secure bootable products.

Download UNetbootin Tool:

Steps to create a bootable USB:

  1. Download the UNetbootin version for your current operating system from the links above.
  2. Connect a USB flash drive to your computer.
  3. Open UNetbootin. You may need Administrator or root privileges.
  4. Select "Diskimage" and make sure "ISO" is selected in the dropdown.
  5. Browse to and select the D-Secure Drive Verifier ISO file provided to you by D-Secure.
  6. Make sure "USB Drive" is selected as the type, and choose the correct USB drive.
  7. Click "OK" to write the ISO to the USB drive.
  8. When it finishes, use this USB drive to boot the machine whose drives you want to verify.

Important:

Writing the ISO erases all existing data on the USB drive. Back up any important files before you start.

PXE Network Boot

With PXE network boot, machines start D-Secure Drive Verifier directly from your network instead of from a USB drive. Use it to verify many machines at once in an ITAD or data center environment.

  1. Set up the Drive Verifier boot image on your PXE server.
  2. Set the target machines to boot from the network (PXE) in their firmware settings.
  3. Start the machines. Each one loads Drive Verifier from the network.
  4. Make sure the network gives the machines internet access so they can validate the licence and upload reports.

Need help with PXE?

PXE server setup depends on your network. Contact support@dsecuretech.com for help preparing the boot image for your environment.

Installing on Windows, macOS or Linux

To run D-Secure Drive Verifier on a workstation instead of booting it, use the installer for your platform:

  • Windows — Run the EXE installer and follow the on-screen steps.
  • macOS — Open the universal DMG and install the application. The same DMG works on Intel and Apple silicon Macs.
  • Linux — Extract the tar.gz archive and start the application from the extracted folder.

Reading drives at a low level usually needs administrator (Windows) or root (macOS, Linux) rights, so run the application with those rights when your system asks for them.

Signing In & Licence Validation

Signing In

When D-Secure Drive Verifier starts, sign in with the email address and password of your D-Secure account. Signing in validates your Drive Verifier licence online and loads your available credits. You do not need to enter a separate licence key in the application.
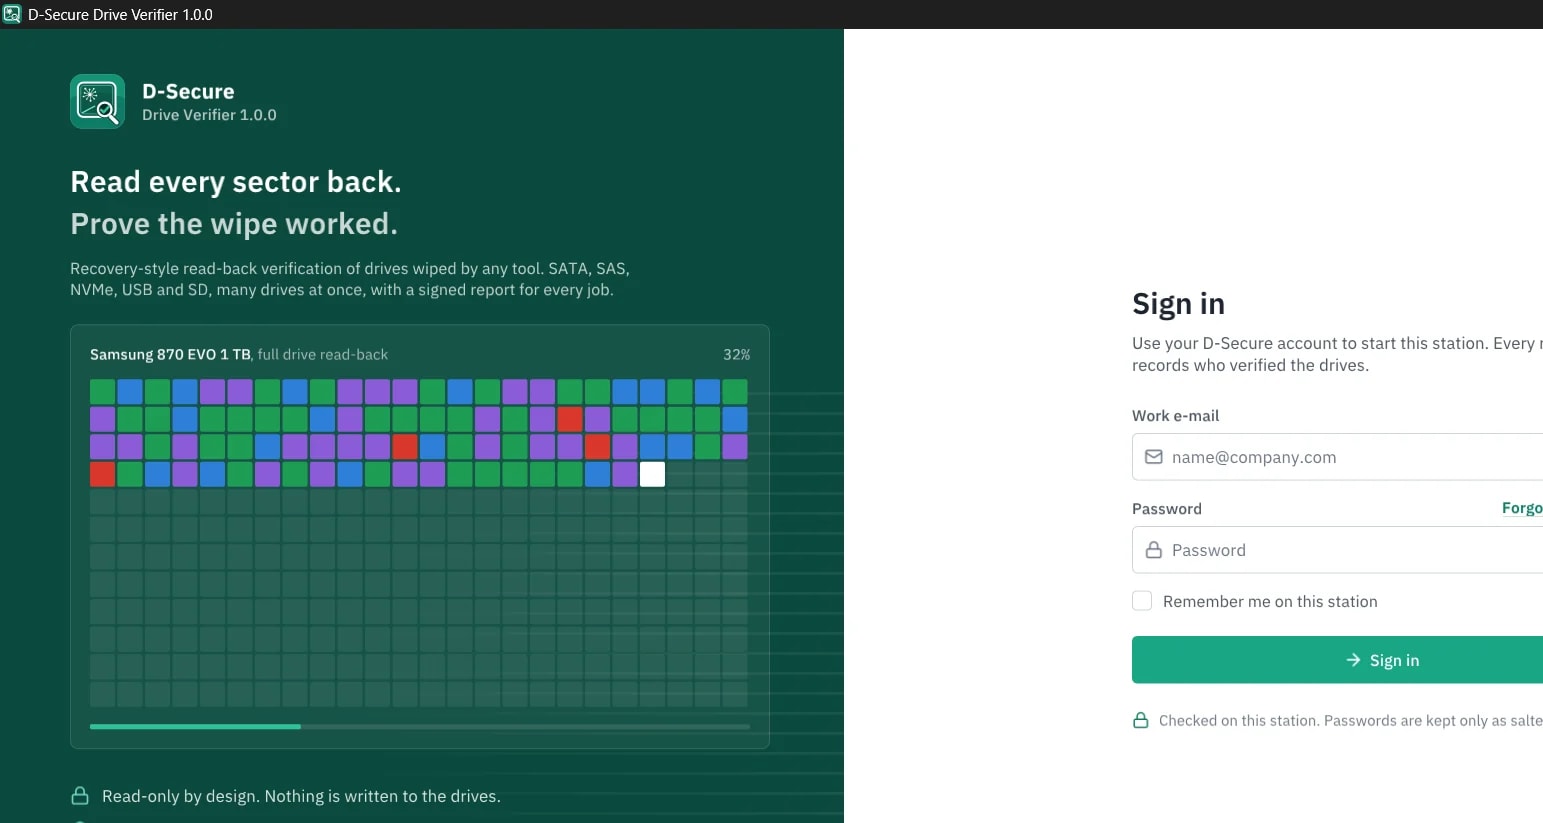
Sign-in screen of D-Secure Drive Verifier
  • Main users sign in with their own account.
  • Subusers (operators) sign in with their own login and use the Drive Verifier licence of their parent account.
  • The application keeps you signed in during your working session, so you do not have to sign in again for every drive. If the session expires, you are asked to sign in again.
  • Signing out removes the saved session from that machine.

Tip:

Repeated sign-in attempts in a short time are rate limited. If sign-in is temporarily blocked, wait a few minutes before you try again.

How Credits Work

Drive Verifier is licensed per drive. Your account holds Drive Verifier credits, which are shown in the application as online credits left and used. For pricing, contact sales.
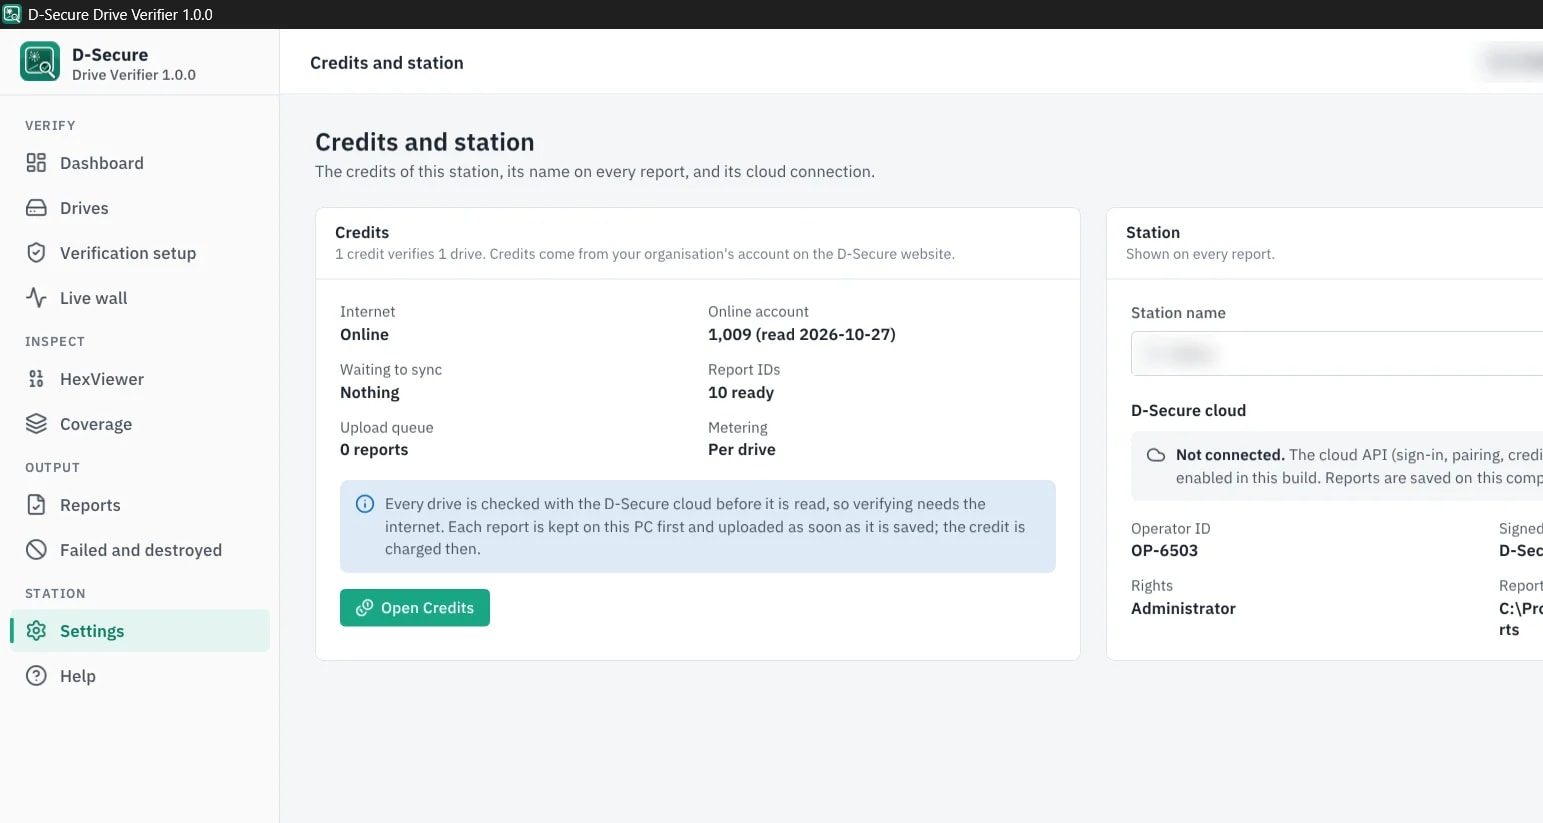
Credits and station: online credits, upload queue and station details
  • One credit per drive with a result — A credit is used when a drive's report with a result (Pass, Fail or Inconclusive) is uploaded.
  • No credit for unreadable drives — A drive that could not be read is reported as Not verified and no credit is used.
  • Free re-verification within 15 days — If the same drive (same serial number) was verified and charged on your account within the last 15 days, a new result for it uses no credit.
  • Credit check before the scan — Before a verification starts, the application checks that a credit is available for the drive. No credit is taken at this point.

In organizations where an administrator allocates credits to subusers, an operator can run out of allocated credits even if the account still has credits. In that case, ask your administrator to allocate more.

Working with D-Secure Drive Verifier

Main Screen & Selecting Drives

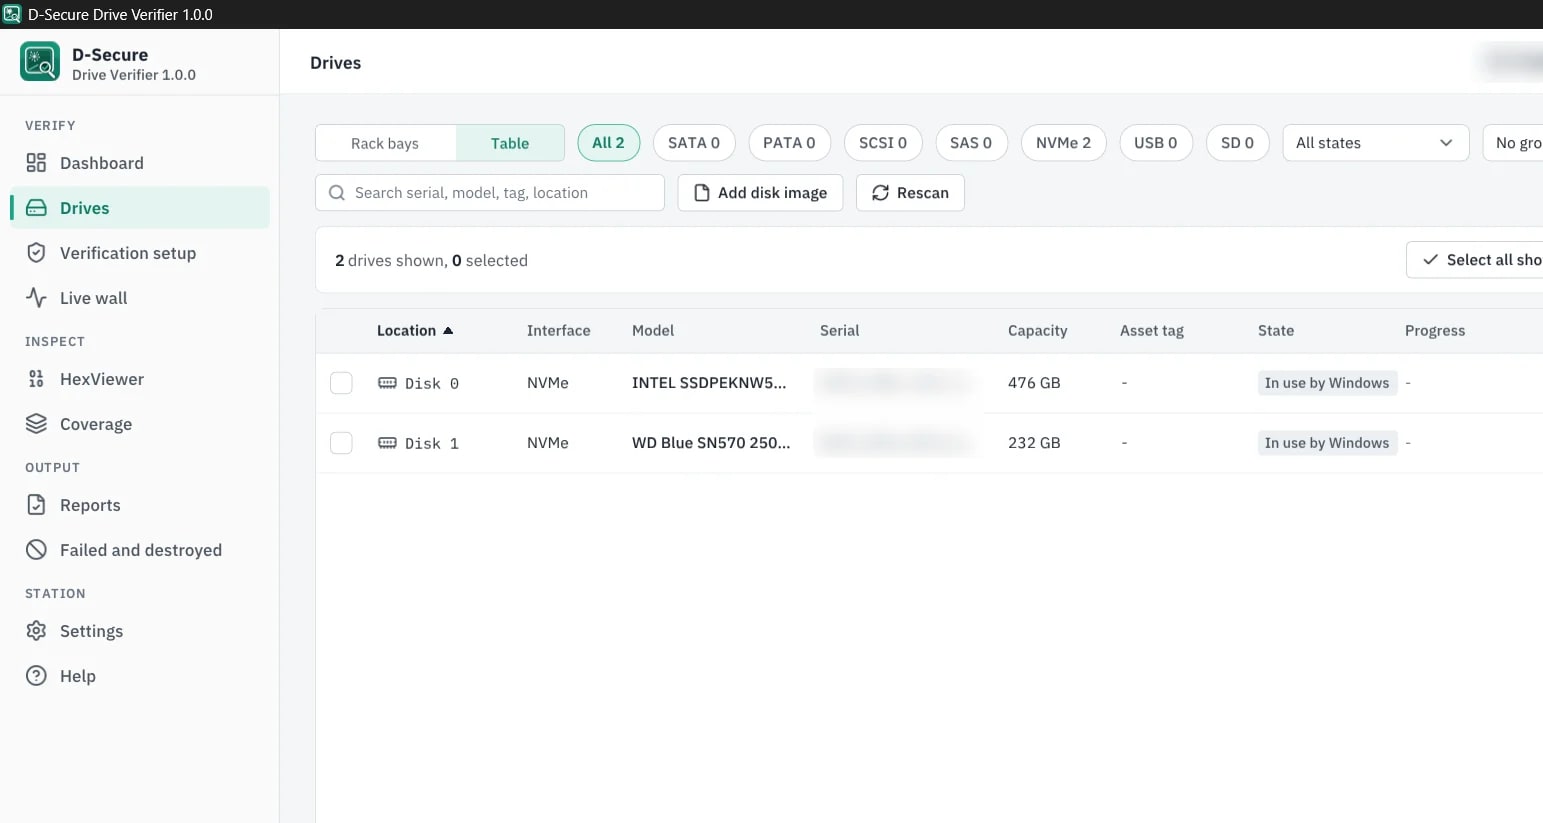
After you sign in, the main screen shows your credit balance and the storage devices connected to the machine. Drive Verifier supports SATA, PATA, SCSI, SAS, NVMe, USB and SD devices.
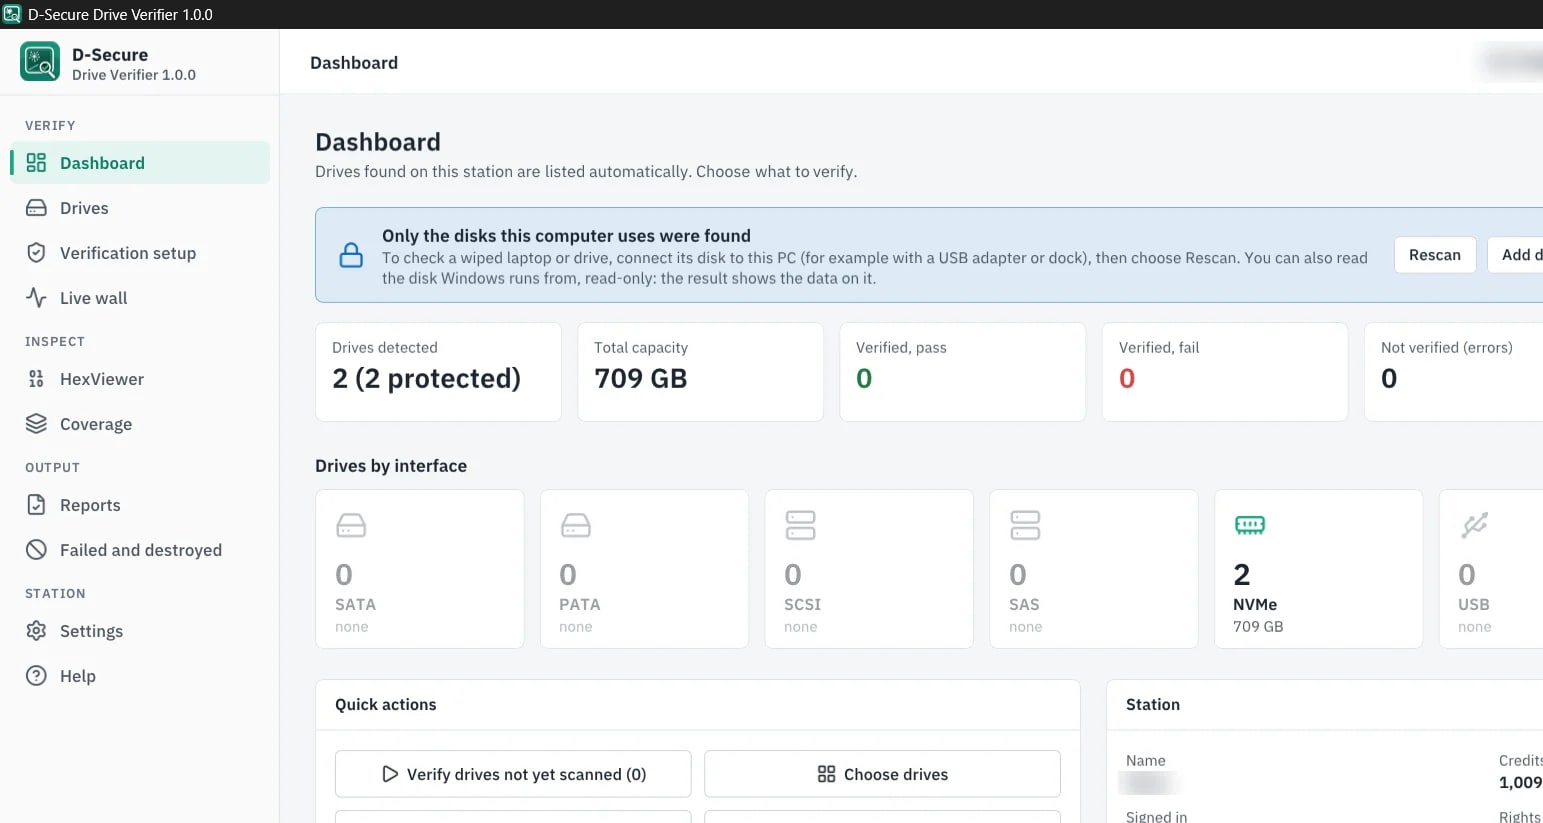
Dashboard: drives found on this station, by interface
Drives list: choose the drives to verify
  1. Check the list of detected drives. Each drive is identified by details such as its model and serial number.
  2. Select the drive or drives you want to verify.
  3. Add asset tags or fill in custom report fields if your workflow uses them.

Drives without a serial number:

Some devices do not report a serial number. Drive Verifier still identifies them with a stable generated ID so they can be reported and verified again later.

Running a Verification

Drive Verifier offers two verification methods:
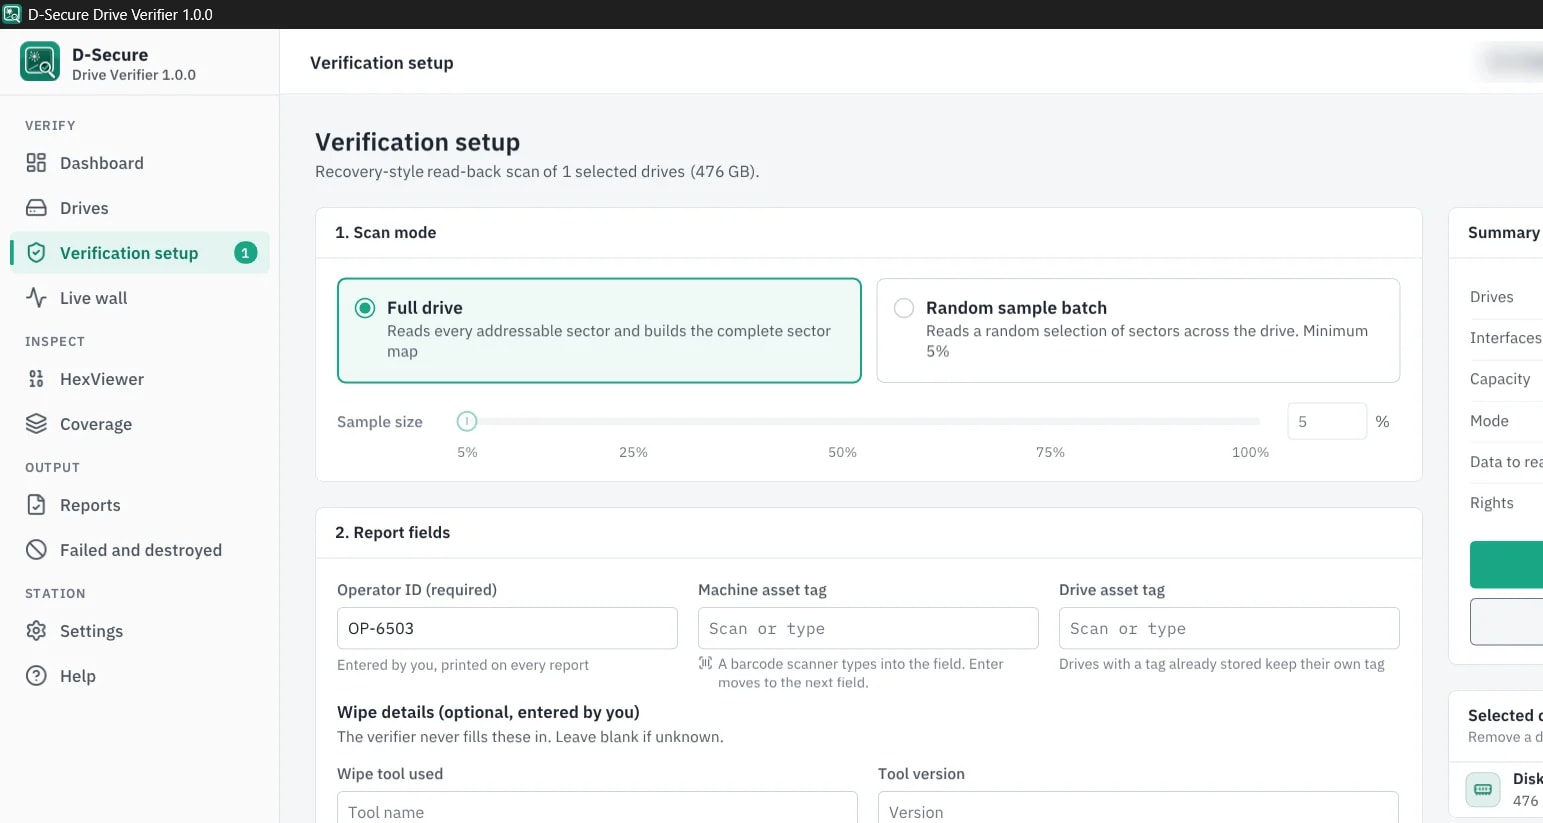
Verification setup: full drive or random sample (minimum 5%), report fields
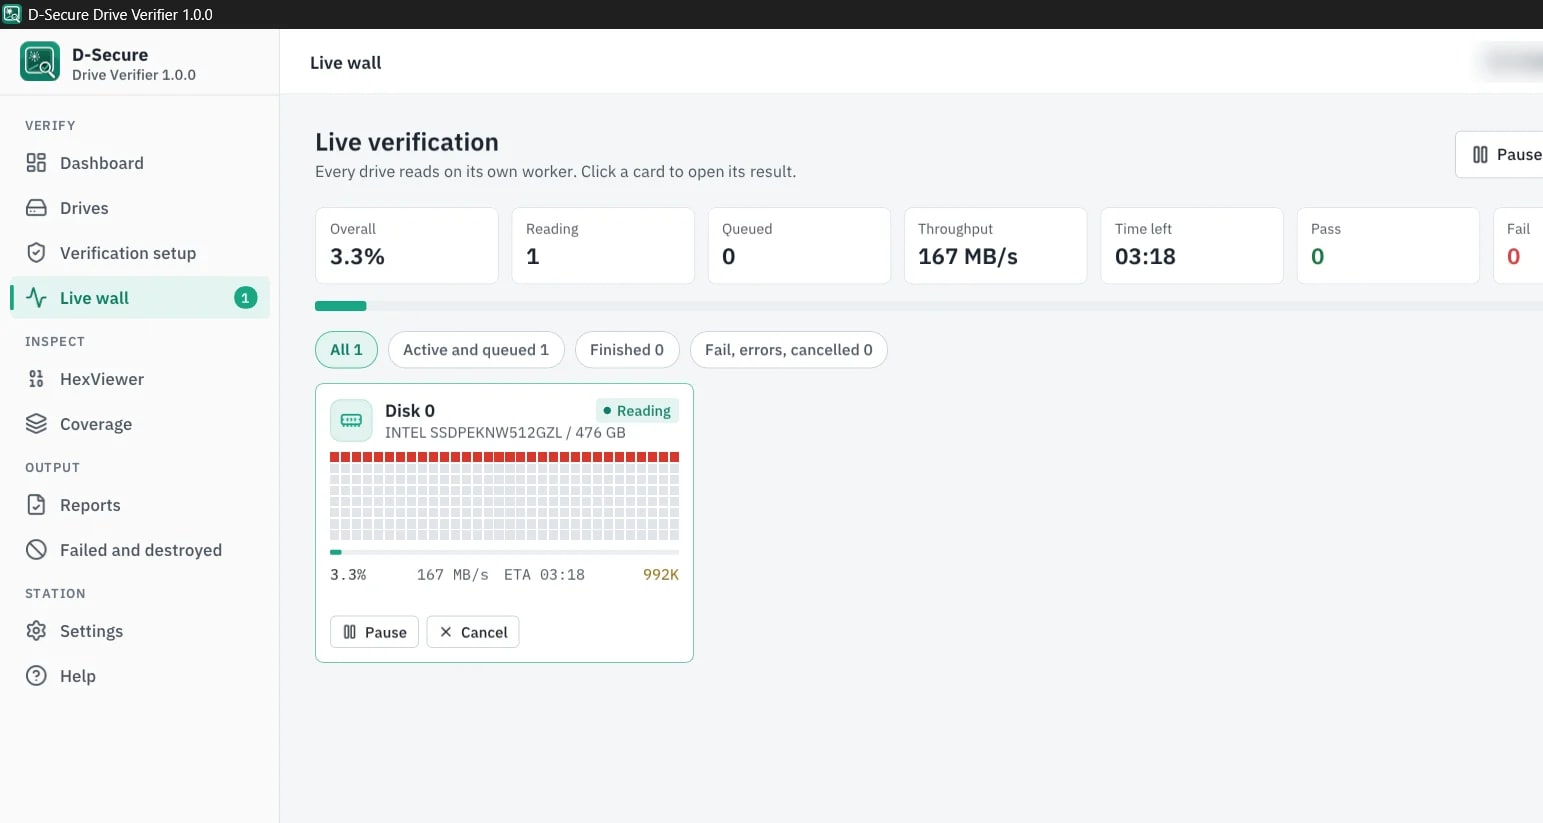
Live verification: progress, speed and time left for each drive
MethodWhat it doesWhen to use it
Total (full)Reads back the entire drive.When you need the most thorough check of a drive.
Random (sample)Reads back a random sample of the drive.For faster checks, for example when your process verifies a share of erased drives.

Steps:

  1. Select the drive or drives on the main screen.
  2. Choose the verification method: total or random sample.
  3. Start the verification. The application first checks that a credit is available and assigns each drive its own report ID (a DS-VERIFY- number issued by D-Secure).
  4. Drive Verifier reads the drive back and examines the bit patterns it finds.
  5. When the scan ends, the drive's verdict is shown and its signed report is created.

Note:

If no credit is available for a drive, the verification does not start. Buy more credits or ask your administrator, then try again.

Reading the Results

Every verified drive gets one of these verdicts:
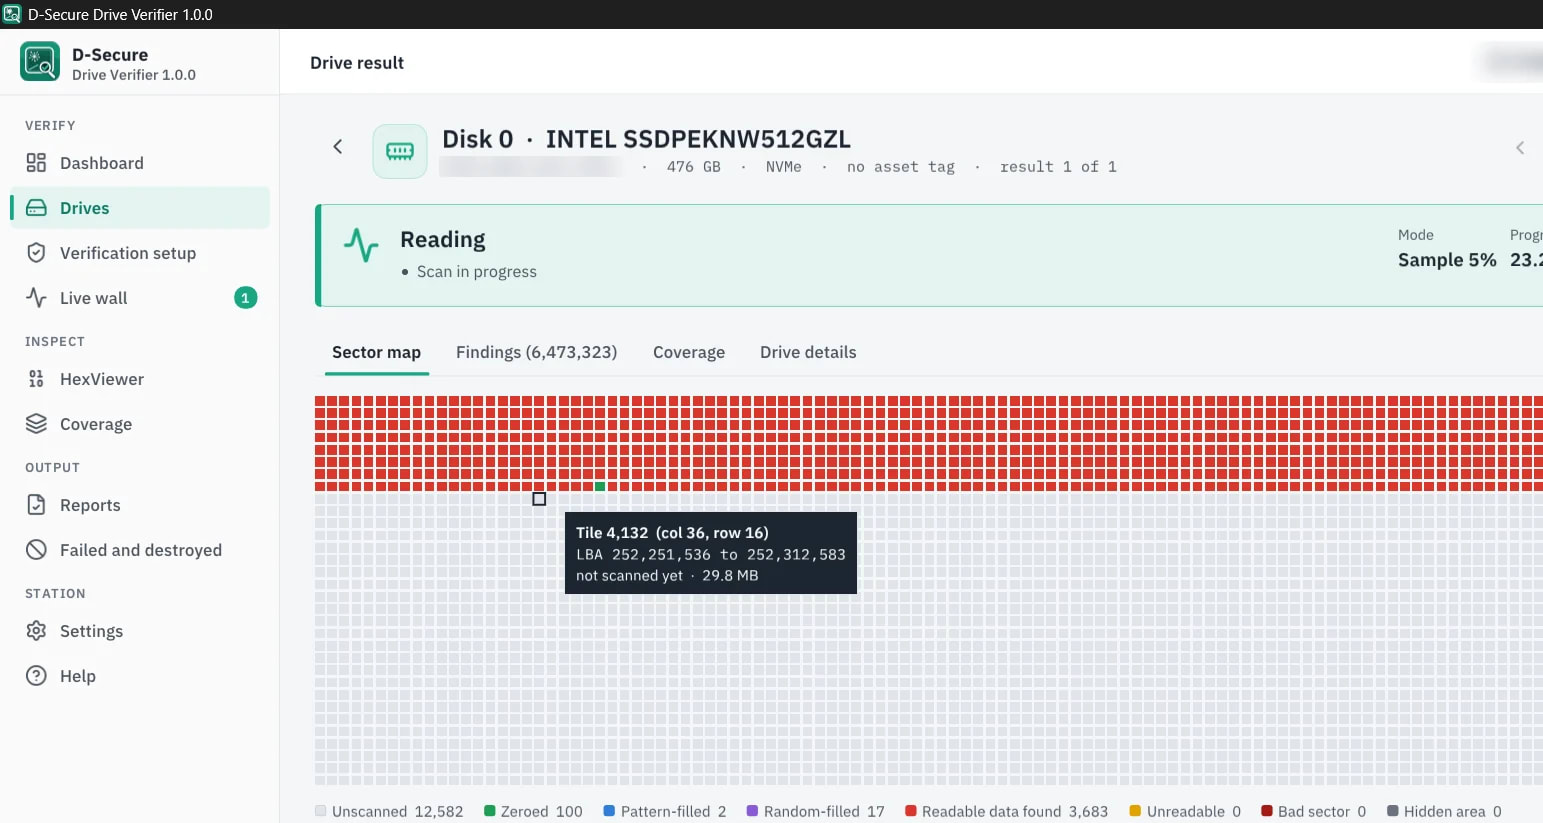
Drive result: sector map with zeroed, pattern, random and readable data
VerdictMeaningCredit
PassNo data traces were found. The drive is clean.1 credit
FailData traces were found. The erasure did not leave the drive clean.1 credit
InconclusiveThe scan produced a result, but it does not clearly show a clean or a failed drive.1 credit
Not verifiedThe drive could not be read, so there is no result.No credit

What to do next:

  • Pass — Keep the signed report as proof and continue with resale, reuse or disposal.
  • Fail — Erase the drive again, then verify it again. Use the HexViewer to see where data remains.
  • Inconclusive — Check the drive and its connection, inspect it in the HexViewer, and run the verification again.
  • Not verified — Check the cable, port or adapter and whether the drive is working, then try again.

A repeat result for the same drive within 15 days of a charged result uses no credit (see How Credits Work).

Manual Checks with the HexViewer

The built-in HexViewer lets you look at the raw content of a drive yourself and manually confirm that erasure succeeded.
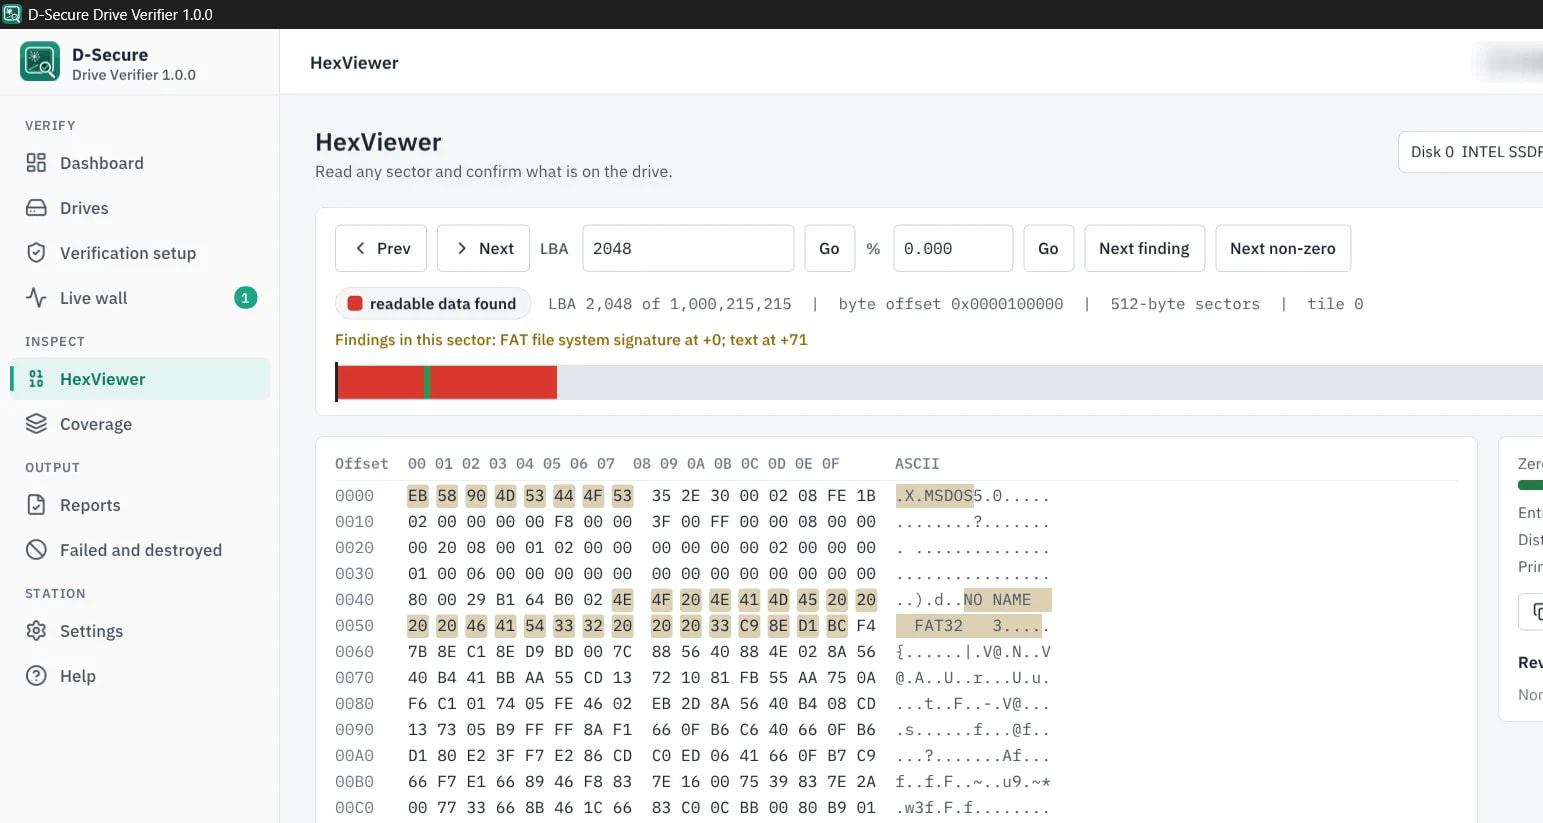
HexViewer: read any sector and see the findings in it
  • Open the HexViewer for the drive you want to inspect.
  • Browse through the drive's sectors and look at the bytes in hexadecimal form.
  • An erased drive normally shows only the overwrite pattern of the erasure method that was used, for example zeroes, a fixed pattern or random data.
  • Readable text, file structures or other recognizable content are data traces and mean the erasure did not succeed.

When to use it:

Use the HexViewer for spot checks, to investigate a Fail or Inconclusive verdict, or when an auditor asks to see a drive's content.

Reports

Report Formats & Contents

Drive Verifier creates a detailed verification report for every drive. Reports are available in these formats:
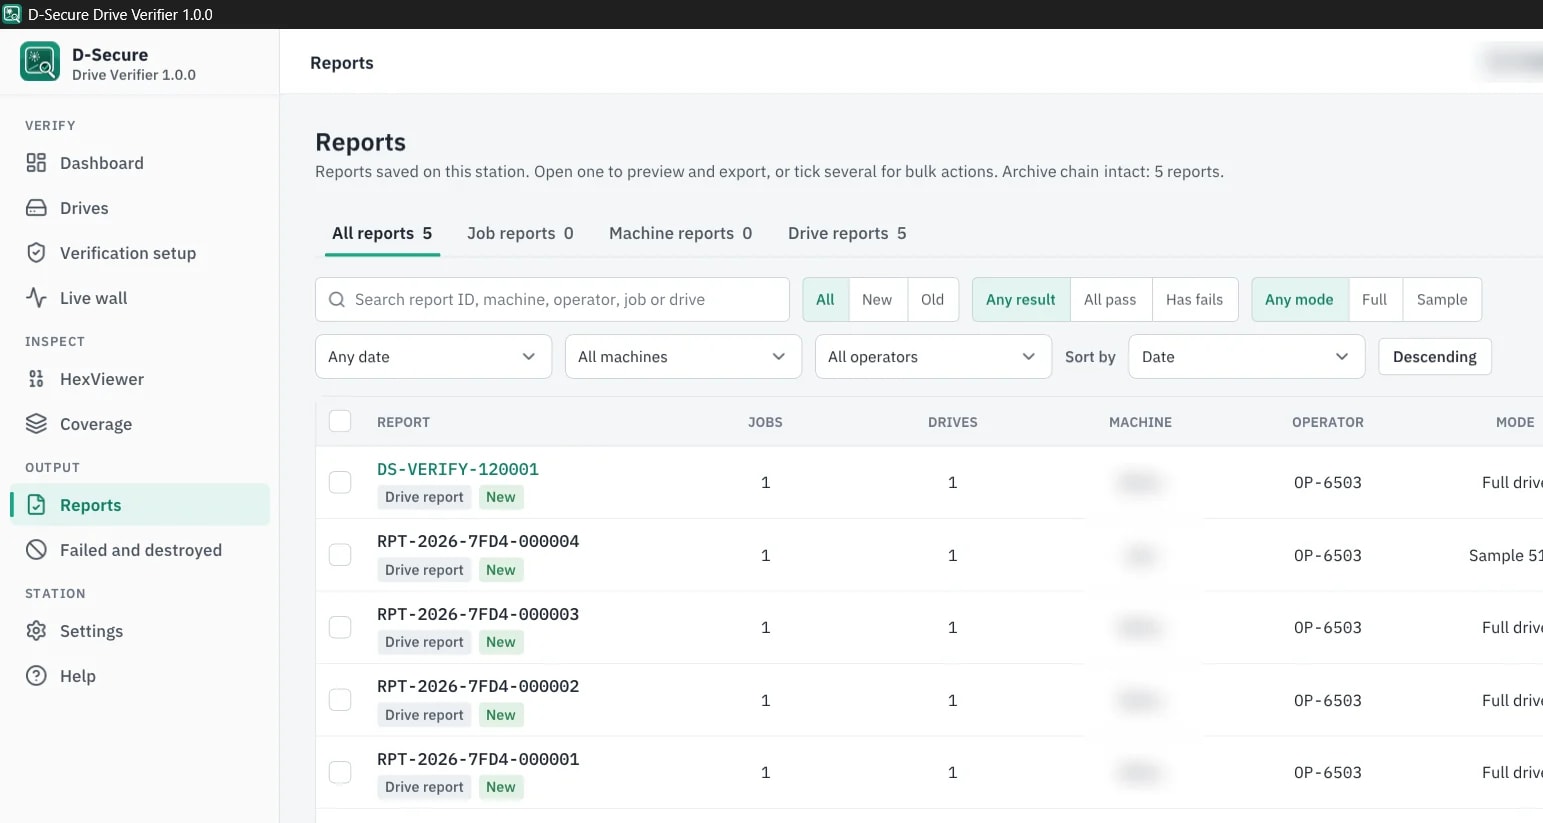
Reports saved on the station, with filters
  • PDF — For customers, auditors and your records.
  • CSV, XML, JSON and HTML — For import into IT asset management software, ERP or inventory systems.

A report covers the drive's details (such as model and serial number), the verification method, the verdict, the report ID and any asset tags or custom fields you added. Report fields can be customized.

One report per drive: each drive has its own report ID. When you verify several drives in one job, the job document lists every drive, and each drive section carries that drive's own report ID and QR code.

Digital Signature

Every report is digitally signed with the D-Secure signing key, the same way D-Secure Drive Eraser reports are signed. The signature covers the report ID, the drive serial number and the verdict, which makes the report tamper-evident: if any of these values is changed after signing, the report no longer verifies.
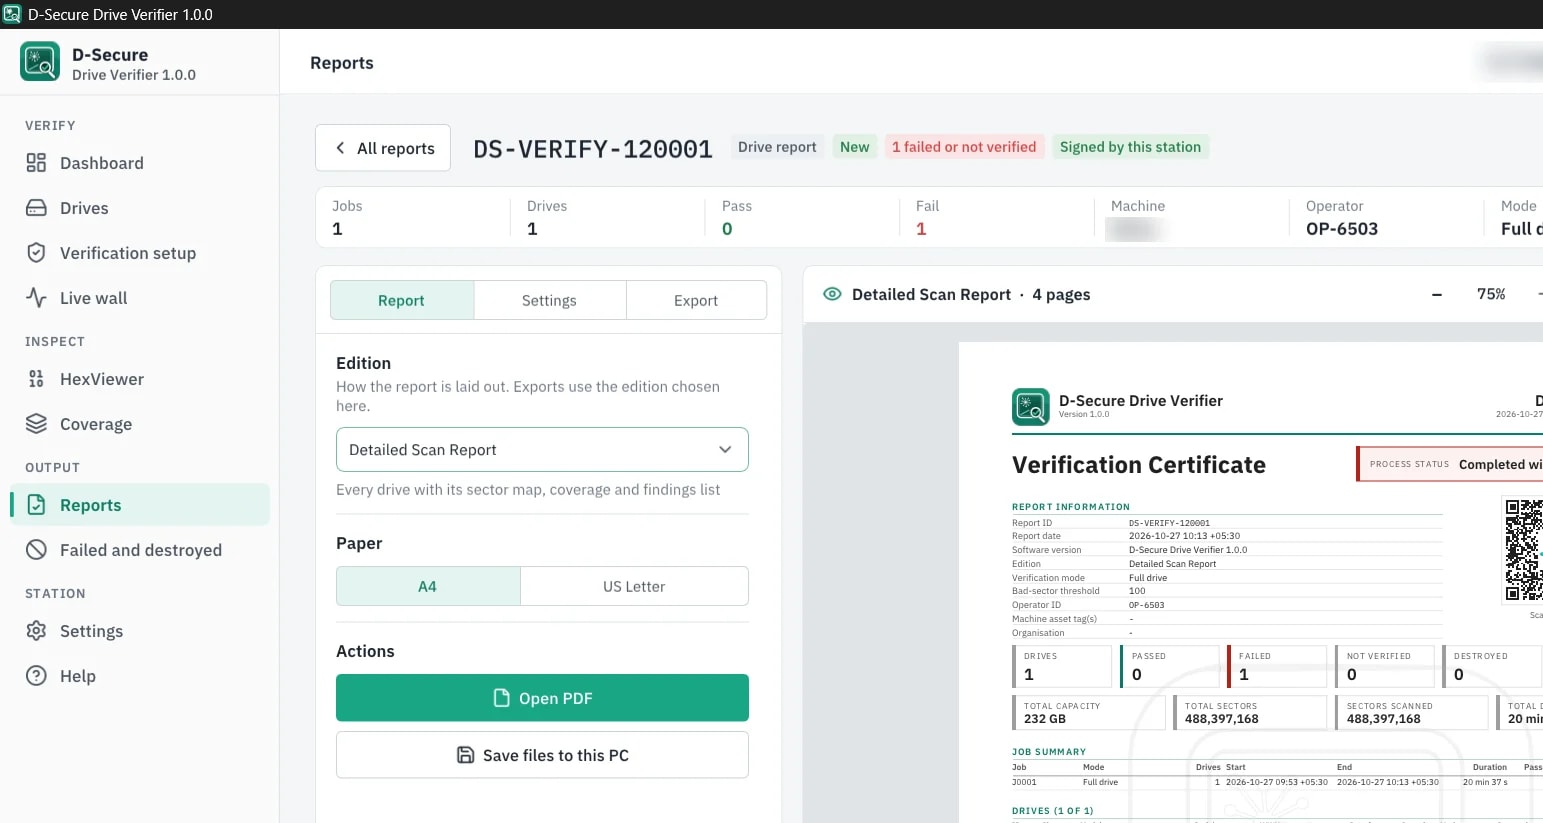
Report preview: edition, paper size, Open PDF, signed by this station

Uploading Reports to the Cloud Console

Reports are uploaded to the D-Secure Cloud Console over your internet connection. In the Cloud Console you can find all verification reports of your account in one place, together with user and licence management.

  • The credit for a drive is used when its report is uploaded, not when the scan starts.
  • After an upload, the application shows whether a credit was used and your updated credit balance.
  • If an upload fails because of a connection or server problem, the report is kept and the upload is tried again later.
  • A report can be uploaded only once. If the application is told that a report was already uploaded, no second copy or second charge is created.

Subusers:

Reports uploaded by a subuser are stored under the parent account.

Verifying a Report

Anyone who receives a Drive Verifier report, such as a customer or an auditor, can check that it is genuine on the D-Secure report verification page.

  1. Scan the QR code printed on the report, or open the verification page and enter the report ID (the DS-VERIFY- number).
  2. The page looks up the report and checks it.
  3. A genuine, unchanged report shows as valid with a summary of the result.

QR code before upload:

Only uploaded reports can be verified. If you scan the QR code before the report has been uploaded, the page shows that the report was not found. The QR code works after the report is uploaded.

Troubleshooting & FAQ

Common Issues

I cannot sign in.

Check that the machine has a working internet connection and can reach the D-Secure services over HTTPS. Check your email address and password. If sign-in is temporarily blocked after several attempts, wait a few minutes. If your account has no active Drive Verifier licence, contact your administrator or sales.

The verification does not start because no credit is available.

Your account has no Drive Verifier credits left, or, as a subuser, your allocation is used up. Buy more credits or ask your administrator to allocate more.

A drive is not listed.

Check the cable, port or adapter, and make sure the drive uses a supported interface (SATA, PATA, SCSI, SAS, NVMe, USB or SD). On an installed application, make sure it runs with administrator or root rights.

A drive shows Not verified.

The drive could not be read. No credit was used. Check the connection and the health of the drive, then try again.

A report has not been uploaded yet.

Check the internet connection. Reports that could not be uploaded are kept and uploaded again when the connection works.

The QR code on a report shows "not found".

The report has not been uploaded yet. Only uploaded reports can be verified.

Frequently Asked Questions

Why is drive verification necessary?

Independent verification helps confirm that the erasure succeeded and that no readable data remains on the wiped drives. Verification requirements vary by program and organization.

Can Drive Verifier check drives erased with other software?

Yes. Drive Verifier supports verification of drives wiped with 27+ erasure methods.

Can I verify many machines at once?

Yes. PXE network boot lets you verify multiple machines at the same time.

Does Drive Verifier work without an internet connection?

No. An internet connection is required to validate your licence and upload reports.

Do I pay for a drive that could not be read?

No. Only drives with a result (Pass, Fail or Inconclusive) use a credit.

How much does Drive Verifier cost?

Drive Verifier is priced per drive. Contact sales for pricing.

Contact & Support

Email: support@dsecuretech.com

Website: www.dsecuretech.com

Product page: D-Secure Drive Verifier